Sunday, February 8, 2015

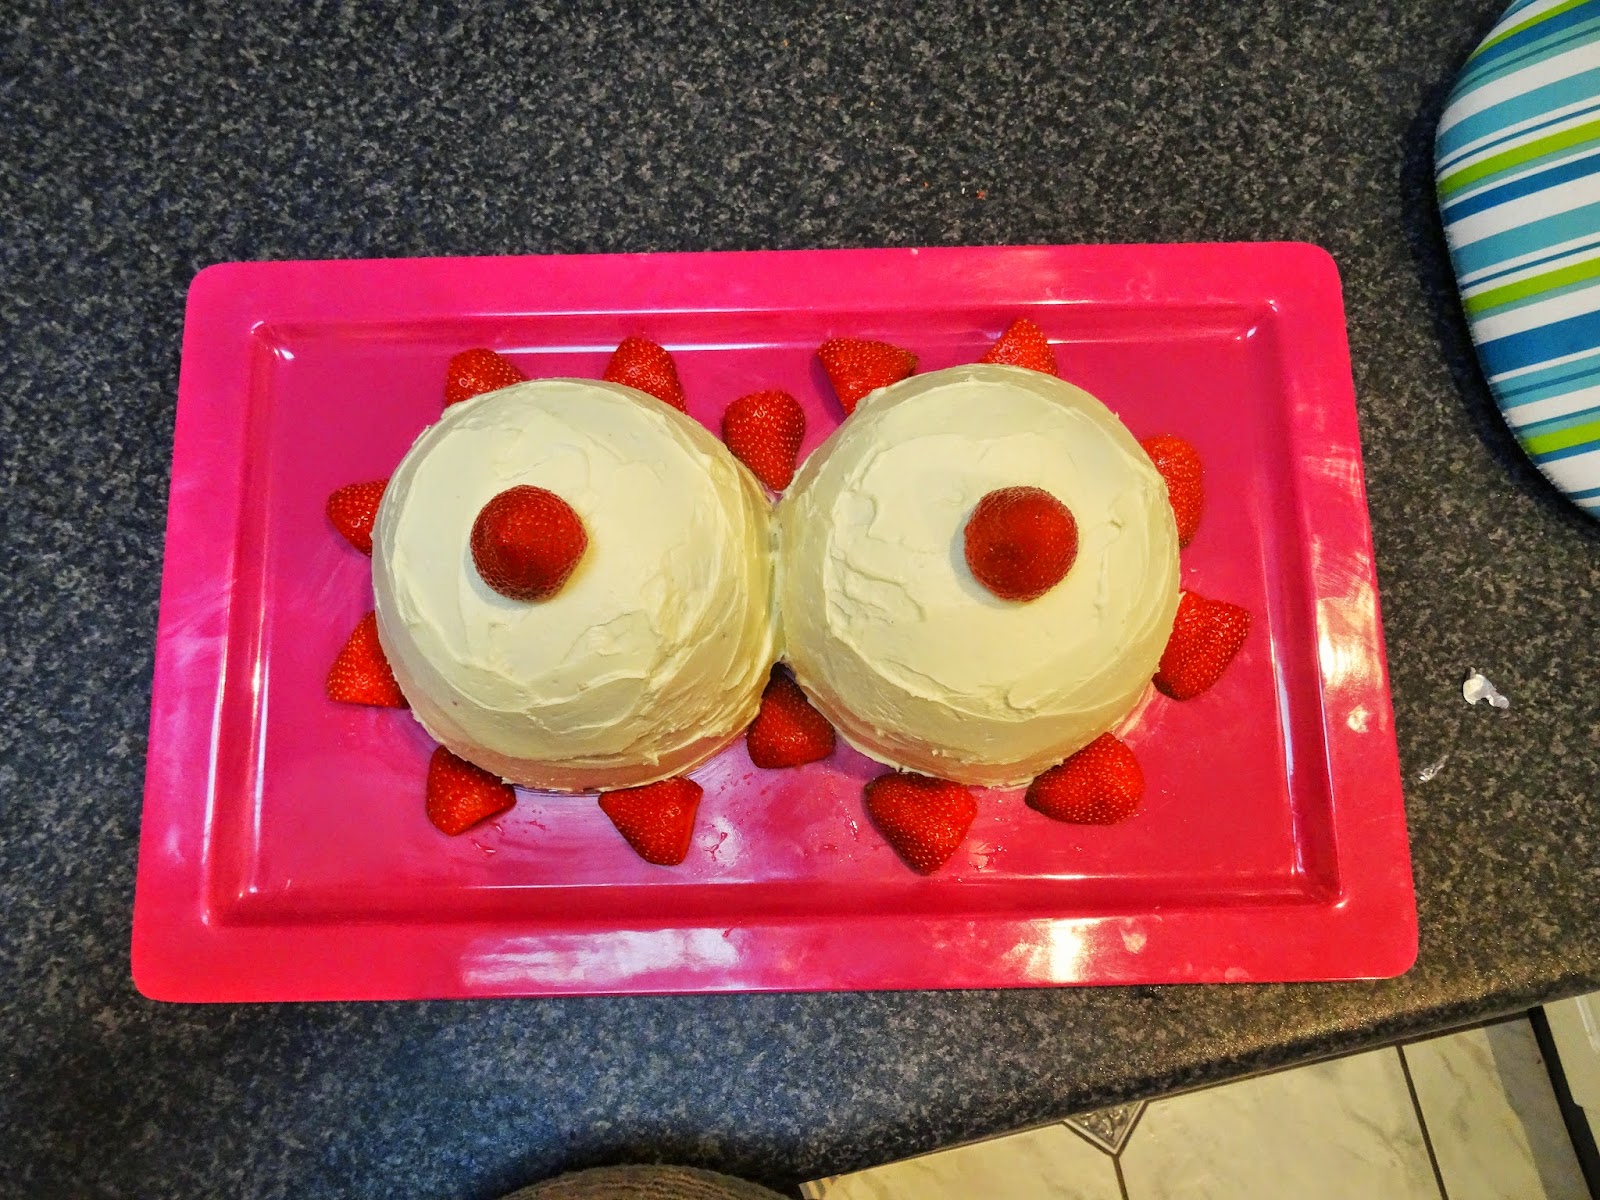
Boob Cake - why not!

The perfect photo opportunity - each bride biting a nipple!
How else do you celebrate an engagement than with a boob cake - well if it is for a lesbian couple then it makes perfect sense! I think I'd question my sister-in-laws taste in men if it was a groom requesting a boob cake, but when both partners like boobs, why not!!

I've never made a boob cake before, but after some searching on Pinterest I found a few different methods - the first decision to make was whether the brides wanted a 'Naked' boob cake (buttercream icing and strawberry nipples), or a 'Lingerie' boob cake (using fondant icing to cover the boobs and create the bra). My brides chose a Naked boob cake, which is definitely the easiest.

Now I don't have a spherical cake tin, so I took some advice from Pinterest and utilised a Pyrex (glass) bowl, and I tell you what, it worked perfectly! I greased the bowl using margarine, making sure there was a good coverage, and then poured the cake batter into the bowl. I also wrapped a strip of paper towel in foil and then tied it around the top of the bowl. I don't honestly know if it made a difference or not, but since the cake came out so beautifully I would definitely recommend it.
Make sure you grease the bowl well.

Cake batter in the bowl, with a wet piece of paper towel, wrapped in foil, tied around the top.

After an hour and 15 minutes in the oven, it was cooked beautifully!

Using a spatula to ease it away from the sides, the cake came out beautifully!

I used a packet cake mix for this cake - a White Wings Raspberry Swirl - and it was the ideal amount. Actually, the boobs were maybe a little too perky, so I could have probably used half of the mixture.

Once the cakes were both cool, I wrapped them in glad wrap and put the in the fridge overnight. Then I trimmed off the tops to make sure they were even, and covered them in buttercream - so easy!


Using a bread knife, the cakes are really easy to level off.


Thankfully the "rough buttercream" look is on trend at the moment - makes for quick icing!
Decorate the cake with strawberries - one on top of each (secured with a tooth pick) to create nipples, and I put some around the bottom of the cake as well, just so I didn't waste any! My husband, however, critiqued my nipples and said that I should have made them a bit shorter and less prominent. What do you think?


Thursday, January 15, 2015

Pregnancy Fashion - Knit Dresses

I am currently in the 24th week of my first pregnancy, and I am finding 'maternity fashion' to be quite a struggle. Most maternity clothes are made to fit you when you're at your biggest, and that is fair enough. A couple of people have asked me "surely you can get stuff for when you're 3 months pregnant, then 6 months, etc.?", but considering the financial investment in a wardrobe to wear for just a couple of months, I can understand why this isn't the case. I have been very fortunate to receive a heap of maternity clothes from my friends, meaning that I hopefully won't have to purchase much at all.

The problem with pregnancy, however, is that there are certain times in your pregnancy when you're too big for your regular clothes, but not really big enough for maternity clothes (unless you're happy to look frumpy, which when you're already in an emotional state is not a good thing). This has been the phase that I've been in for at least a month now since I 'popped'.

What I have found works are dresses - wrap dresses, empire waisted dresses, and knit dresses. They don't have to be maternity dresses and they'll still give you some space around your expanding waist line. I've been able to utilise quite a few dresses from my current wardrobe, as well as being supplemented by many of my friends who have finished having their babies and have passed me many of their maternity clothes.
Rocking a knit dress from my pre-pregnancy wardrobe
(thankfully a cold change in the weather made this outfit possible!).
I am planning to make some maternity skirts and tops that will hopefully emphasise my bump, not try to hide it, and I will post any of my successes (and possibly my failures as well) on here to hopefully inspire some other first time mums. I may even document the many 'make-dos' I implement with my pre-pregnancy wardrobe...although they are pretty embarrassing!!

Wednesday, January 7, 2015

Cake Decorating in 2014

Unfortunately 2014 saw my blogging decrease dramatically! But although I wasn't blogging, I was still crafting and in particular I was still decorating cakes.
So here is a recap of the cakes that I made in 2014.

Baby Shower Elephant Cake
This was a fairly simple cake - apart from the carving of it, and some tricky fondant covering around the trunk and legs. My husband actually made the cakes for these (making one green and one blue), and then did all of the carving as well. Using a bread knife for the bigger cuts, and then a pairing knife for the detail, made it a lot easier. We also used some of the 'scraps' from the back to actually make the trunk.
I used some button fondant moulds for the eye and to attach the tail. Everything else was done completely by hand.


The Beatles 60th Birthday Cake
This cake was commissioned by a colleague of a friend of mine (complete stranger). They had ordered a cake, and found out a week before the party that the cake wouldn't be coming! So I stepped in and made this cake. It is covered completely with fondant.
I printed out The Beatles logo and the text to go around the cake, and used that as a template. They wanted black ribbon around the bottom of the cake, but I decided that a black fondant ribbon was better because you'd be able to eat that!


Rodeo Princess Cake
This cake was requested by a woman that I worked with for her daughter's 21st birthday party. I was told that Alex-Kate was a girly girl who was also a little bit country, so a Rodeo Princess cake seemed perfect.
The entire cake is covered in fondant, and everything is made out of fondant. I used a letter cutter for the letters and numbers (always be sure to make extras just in case you break some!), and I used an 'extruder' to push out the perfectly even lengths of fondant for the crown, but unfortunately I didn't use any CMC or Tylose in the fondant for the crown and so it ended up falling apart, so frustrating! I followed this tutorial here to make the crown.

Hydrangea Birthday Cake
I have been wanting to make a cake like this for a while, and so my Mother-in-Law's birthday presented the perfect opportunity. Using a hydrangea mould and cutter, I pre-made all of the flowers a week or two before hand (while watching Sex and the City probably). I used a couple of different shades of blue, and also dusted the petals with some blue and green petal dust.
Once the petals were done, making the cake itself wasn't too hard. My husband helped with the carving once again, and we got the pot sorted and then just piled the left over bits of cake on the top. I covered the top with some regular icing and then got to sticking all of the flowers onto it. I was really happy with the result, and I would definitely make a cake like this again.

The Little Mermaid Cake
A while ago I bought a red-headed Dolly Varden doll, just in case I ever got to use it. Thankfully my sister-in-law's birthday offered me the perfect opportunity (she loves The Little Mermaid!). I had some trouble making the Dolly Varden cake, unfortunately, and that was really frustrating, but once I had one I could use, the rest was really easy.
For Ariel's tail I just used a big piece of green fondant and shaped it into a tail. I then used a little cake decorators tool to press in all of the scale like indents. My husband had a lot of fun helping me with making some shells and other sea creatures to decorate the rock, and I used a branch mould to make some seaweed.

Marilyn Monroe Birthday Cake
For my Mum's birthday I decided that a Marilyn Monroe cake would be perfect - she's been bugging me to make her a cake for ages, so I finally caved and made this.
This is probably one of the hardest cakes that I've ever made. After covering the cake in white fondant I used a silhouette template to trace the design directly onto the fondant. Then I used a black royal icing tube to carefully go over the tracing. It took quite a while, resulted in some very sore hands, and I wasn't completely happy with how it turned out. But it was very tricky, so I was happy enough. The bow was probably the easiest bit! 


Paris Birthday Cake
This cake was made for a very special 9 year old's birthday - she had recently become obsessed with all things French, and therefore a French themed cake was required. The Mum had purchased the Eiffel Tower, so that made life a lot easier in making the cake. I did have a few issues, however, because I was using a brand of fondant that I'm not used to (Satin Ice, whereas I usually use Pettinice) and I found that it was quite sticky and didn't hold it's form as well as I would have liked. But the cake worked out quite well and was enjoyed by all (and naturally it was pink and white inside!).
Pole Dancing Birthday Cake
One of my colleagues at work is a Pole Dancing star, and so her birthday was the perfect opportunity to make a pole dancing cake. The cake is covered with fondant to resemble a stage, and I wrapped a skewer in white fondant which I then painted silver with edible paint.
To make the pole dancing figures I printed out photos of Glentin from Instagram and made them into stencils (some black texta to colour them in, then covered with sticky tape and cut out). Instead of using fondant again, I used pre-coloured modelling chocolate. This was the first time I had used modelling chocolate and it was really easy to work with (once you warm it up enough so that it is pliable). I rolled it out into a sheet, and then cut out the silhouettes using a knife. I put the cut silhouettes in the fridge to go hard, and then on the day of presenting the cake I stuck them to the pole using some flower glue. It worked perfectly!

Sex Panther Cake - 60% of the time, it works EVERY time!
Another of my work friends is an Anchorman fan (always quoting the movie), so I decided to make her a Sex Panther cake. Completely random, I know, but fun nonetheless.
It's a basic square cake, I coloured some white icing green and piped it on to represent the grass that the Sex Panther cologne sits in, and used brown icing around the sides to represent the box. The Panther head was a bit trickier - but with a big ball of black fondant, a great online guide (find it here), and some persistence, I made it happen. Unfortunately my friend was totally confused when she first saw the cake - but then she got it and loved it. Her partner tried to eat the Panther head, but the fact that it is made from pure fondant defeated him.

St George Illawarra Football Team Cake
Another work friend and another cake - this time for a farewell. For this cake I got a print out of the football teams logo and used flood icing to recreate it. Basically I got a piece of Freezer Go-Between (clear plastic stuff) and laid it over the print out. Then I got black royal icing (fairly stiff) and piped the outline of the logo. Once that was set a bit I went back with some softer royal icing and 'flooded' the parts. After leaving that to set I went back to re-enforce some of the black lines.
I then placed the set logo on top of a red fondant panel using some flower glue, and used red icing to paint on the words (I was too lazy to use fondant). When doing something like this it is always good to make a couple, just in case something breaks. Actually I think the horses leg had snapped off, but it was easy enough to re-attach to the background. The cake inside was one layer red, one layer white.

Tardis Birthday Cake
This cake was requested by a friend for his 30th birthday, and so I did my best. I learnt a lot from doing this cake, especially that the internal structure of the cake is probably the most important thing! Because the cake was not completely square and level it made it more difficult to cover with fondant, and then it also meant that it ended up collapsing a bit (even though I had used skewers to reinforce it).
If I was going to make this cake again, I would: use denser cake so it is more brick like, use bigger dowels through the cake to try and sure it up, pre-make the windows to put on as I think it would have looked a bit neater.
Although it wasn't perfect, the overall effect was there, it wasn't a bad first try.

And that, my friends, is a year in cakes!! I'm not sure what 2015 will bring as I am due to have a baby in May - so it may be only store bought cakes from here on in!

Tuesday, February 18, 2014

A more focused blog

As you would be able to tell, I haven't been blogging very much at all.

I think that I get a bit distracted by the types of things that I could be blogging about, and then just don't end up blogging at all. This blog features posts on all sorts of things from sewing, cake decorating, historical women and more! It is really quite haphazard.

So I have launched a new blog today called "Elegant Duchess" which will be focused on one topic - a book called "Entertaining with Elegance" from 1966 and how it applies, or doesn't apply, today. Elegant Duchess will go through this book, chapter by chapter, and will provide a summary of what the book advises and then a comparison to what occurs today.

This blog I will leave open for when I want to blog about crafty stuff - but I'm honestly not sure how much blogging I will do, and I definitely won't commit to anything! I thought at the end of last year that I would start blogging more, but then my cat was run over by a car and had to have his front right leg amputated - so that has all been quite stressful, and my craft has suffered a bit because of it.
I've still been doing a bit of cross-stitch, and some sewing, but I find my inability to focus on one project or craft to be fairly extreme at the moment.

Head over to my new blog where, hopefully, there will be regular posts on all things 'entertaining'.

Tuesday, December 17, 2013

Finally - some creativity!!

With Christmas fast approaching, and a new house and trip to Europe next year impacting our budget, we have been making Christmas presents for our family. When I say "we", I'm using the term loosely. My husband thought it would be a great idea to make Christmas hampers filled with goodies, and last night he finally made some of the chocolates to go into the hampers. Otherwise its been just me making all of this stuff!

But more about the Christmas hampers later. Today I wanted to show ou what I have made for my two team members at work (both young women in their early twenties).

Both of them are getting a set of Luggage Tags:


I made these luggage tags using a pattern that I bought on Etsy from StudioCherie - you can click here to purchase this pattern yourself.

Then for Glentin I made a slipper heat pad - basically a little thing, lined with crushed velvet and filled with rice, that she can pop in the microwave to heat up and then put her feet in it to keep them warm.

I saw this on Pinterest, but didn't actually use a pattern. It's pretty easy to make without one.
Using a magazine as a guide for size, I cut out the fabric for your feet to go on (I used crushed velvet so it would be soft), and fabric for the base (I used denim, hoping that it will be durable). I also cut out the same size interfacing and fused this to the base.
Then I cut out the top fabric and another piece of the velvet to roughly half the size of the base - so that there is a cover for you to slip your feet into. Again I put interfacing on the top fabric to make it a little sturdier.
I sewed the two small pieces together (wrong sides together), making the top pretty and neat since you'll be putting your feet in there. Then I sewed the top pocket to the large velvet piece (velvet pieces together).
Once this was done, I put the right sides together and sewed the whole lot, leaving an opening for turning it in the right way. Then you put in the rice, and sew it all up.

And a last present for Ellen, bath salts. I actually gave her some Sugar Scrub as well - but she needed that early due to an issue with fake tan around the ankles! The bath salt recipe I got from Madame Clochette (who happens to be my sister) - you can find it on her blog here.


It's not much, but I hope the girls enjoy what I have made for them, or at least appreciate the thought that went into these gifts - since it is the thought that counts after all!!

Monday, December 9, 2013

A year without blogging!

I can't believe, looking at my blog today, that my last post was on the 27th of January!! It has been 11 months since my last post!
Yes, I should be slapped and monkeyd with!

So what has happened in this past year? Well - the 12 Week Body Transformation didn't happen, I can tell you that. While I did pay for the program, and followed it for maybe a week, I gave up very quickly.
That being said, since the wedding last year, I have dropped 5kg which is quite nice.

You can see in this photo (where I'm dressed as Maverick, with my husband Goose from Top Gun) that I have lost weight since my post in January this year. 

I bought a house with my husband, and we have been busy setting up our home. Lots of shopping and gardening, but thankfully very little renovating.

My craft has been very light on this year, unfortunately, with nothing much to show. I have contributed to a couple of quilts for new babies, cross stitched a couple of things, and started many projects. But my list of unfinished projects is very long!

Hopefully the next 12 months will see an increase in my blogging - it really is a great way to keep track of what is happening in your life.

Sunday, January 27, 2013

Commitment to the 12 Week Body Transformation

I have committed to participate in the Michelle Bridges 12 Week Body Transformation, kicking off on 11 February. The goal that I'm working towards is increased fitness, but more importantly a smaller waist. You'll be able to look back at past posts and see that my measurements are not my best point, not in regards to being too big or too small, but just not in proportion (according to sewing patterns!).
It is currently "Pre-Season" for the 12WBT, and we have to go through a number of tasks, the current one being 'Say it out loud' - so I've posted in the 12WBT forum, on FaceBook and Twitter my commitment to the challenge. Hopefully this will help me stay on task and actually complete the challenge.